| |
| |
| |
| Golden Numbers |
| You can get Golder Numbers of Zong in a low price |
| SOCCER WORLDCUP 2010 SCHDULE |
 |
 |
 |
 |
| Third Topic |
| UNDER CONSTRUCTION |
| FOURTH TOPIC |
| UNDER CONSTRUCTION . |
| FIFTH TOPIC |
| UNDER CONSTRUCTION . |
|
| Create Your Own Icon |
| Saturday, June 19, 2010 |
Note: This tip will only work in Windows XP.
Just follow the steps given below to create your own icon!
1.) Open the Paint program by going to Start, All Programs, Accessories, Paint.
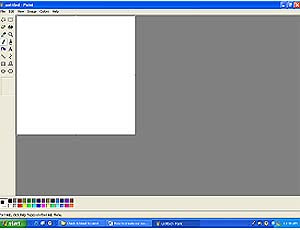
2.) Select Attributes from the Image Menu.
3.) The Attributes dialogue box will then open.
4.) Change both the Width and the Height to 32.
5.) From Units, select Pixel.
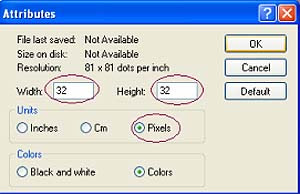
6.) Click OK.
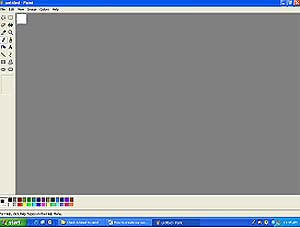
You'll notice that the height and the width of the screen reduced to 32 pixels. That is going to be the size of your icon.
Now, go ahead and draw whatever you'd like your icon to be in the Paint program. When you're finished, save the file by going to File, Save As. Go ahead and give your file a name, but make sure it's formatted with the .ico extension (.ico is for an icon file). For example, save it as face.ico.
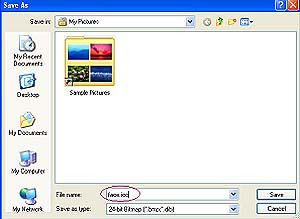
Now, set the Save as Type to be a 24-bit bitmap (*.bmp; *.dib) and then store it in your My Pictures folder.
There you have it! You have created our own icon. Now, let's see how you can replace this icon with the a default icon that Windows XP provides (just in case you ever feel like going back to them).
To do this:
1.) Right click anywhere on your Desktop.
2.) Select New and then from the submenu, select Folder.
3.) A folder named New Folder will be created on your desktop. (You can change this name if you want. Just right click on it and choose Rename).
4.) Next, right click on the new folder and select Properties.
5.) Click on the Customize tab.
6.) Click the command button of Change Icon under the Folder icons menu.
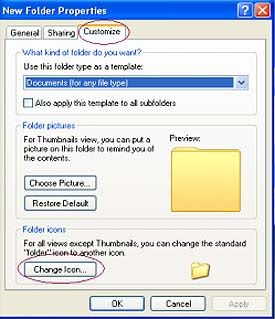
7.) On the next screen, click on Browse and select the face.ico file from your My Pictures folder. Then click OK for the changes to take effect.
Now you can see the icon you created. It will automatically replace the default Windows XP "New Folder" icon. It's not only for your folders; you can also use it for any files, shortcuts, etc. Now, you can go and create any number of icons and replace all of your files and folders, if you so choose. |
posted by Muhammad Tayyab @ 11:33 PM  |
|
|
|
| Download YouTube Videos the Easy Way! |
|
How about this:
While on YouTube, navigate to a video you want to download to your computer and up in the address bar of your browser, replace the “Y” in YouTube with a number 3 and hit enter.
Look at this picture for an example:
 You'll be taken to the 3ouTube site where you'll have the choice of downloading in MP4 or FLV formats! You'll be taken to the 3ouTube site where you'll have the choice of downloading in MP4 or FLV formats!
 |
posted by Muhammad Tayyab @ 4:11 AM  |
|
|
|
| How to Block Specific Websites on Your Computer |
| Friday, June 18, 2010 |
Go to the Start>Run and type “cmd”. Click on OK so that the Command Prompt Window appears.
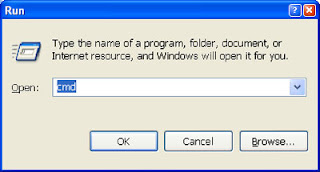

In the Command Prompt Window, type “notepad C: /Windows/system32/drivers/etc/hosts” minus the quotes, and hit the Enter key.

You can see the hosts file notepad popped out. In the notepad, you will enter the list of sites that need to be blocked in your system.
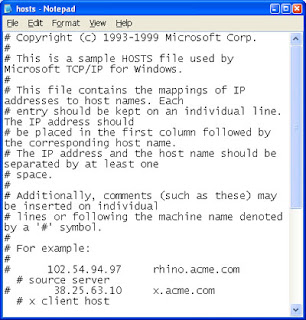
Note: An alternate option to access the notepad is to go to My Computer icon and follow the path My Computer>Local Disk (C :) >Windows>system32>drivers>etc to locate the hosts file in etc folder. Right-click on the hosts file and open with notepad.
Once you reach the notepad, find the line 127.0.0.1 localhost from the notepad entries. Below the line, type 127.0.0.1 and after a space, enter the address of the website to be blocked in “www.websitename.com” or “websitename.com” format, depending on the URL of the site.
For example, if you wish to block the site http:// twitter.com, type “127.0.0.1 twitter.com” and in order to block http://www.reddit.com, type “127.0.0.1 www.reddit.com”. Remember to give the exact portion of the URL that comes after “http://” for main domains as well as subdomains.
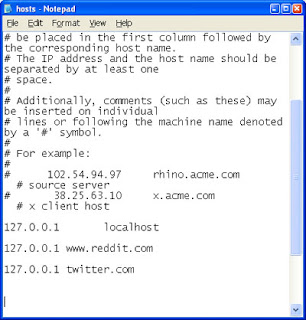
In order to block multiple sites, give the URLs of the sites in separate lines, each followed by 127.0.0.1 and it looks somewhat like this. Many sites use the http://www.site.com and http://site.com version of the URLs, so be sure to include both.
127.0.0.1 www.website1.com
127.0.0.1 website1.com
127.0.0.1 www.website2.com
127.0.0.1 website2.com
127.0.0.1 www.website3.com
127.0.0.1 website3.com
Go to the File menu in notepad and select Save to save the file. Now close all the browsers you are using and restart then to check if the blocked websites can be accessed. Type the blocked site’s URL in the address bar of the browser and hit Enter key to see the results. All you can view is an error page or the local web page in your system |
posted by Muhammad Tayyab @ 5:20 AM  |
|
|
|
| Safe Mode ? |
|
Safe mode is a Windows maintenance mode where only the bare minimum of drivers are loaded. You don't have access to CD ROMs, printers, or other non-essential devices.
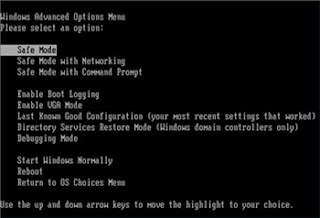
It's helpful to use this mode when you are having problems with your PC. For example, maybe you just installed an awesome new video card, but in all the excitement loaded the wrong driver for it. This in turn caused your video display under windows to be non-existant. If you go into Safe mode, you can fix it.
I also use it to help find problems with programs. If I get lots of "illegal operation" messages, I try running the program in safe mode to see if the program itself is the problem. If the program runs fine in safe mode, I can assume I have another program or driver that's interfering with the program's operation and causing the error. (Note that not all software runs in Safe mode - especially more robust programs, but it's still worth a shot).
To get to Safe mode, press the F8 key when Windows starts to boot. You have to do this BEFORE you see the first "Windows" screen. I start tapping away at mine when as soon as I get by the BIOS startup screen or the manufacturer's splash screen. Experiment and you'll get it. |
posted by Muhammad Tayyab @ 2:59 AM  |
|
|
|
| Turn a YouTube Video into a Ringtone |
| Thursday, June 17, 2010 |
YouTube features many up and coming artists who do not have songs available for ring tone downloads from our favorite ringtone sites. Some of these artists do not even have MP3’s of of their music readily available.
With a free service called Tube2Tone, you can turn any part of any video on YouTube into a ringtone. So, besides using unknown artists’ music as ringtones, this means your dreams of having a different Weird Al song for each person on your contact list could come true—for free!

First, find a video on YouTube you would like to use as a ringtone. Copy the video’s URL.
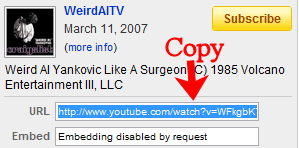
Next, navigate to Tube2Tone.com. Paste the YouTube URL in the box that says search or Enter Video URL and click Search.

A page then appears with the video in a unique player. This player allows you to watch the video, then only record the part you want to use as a ringtone. You can record a maximum of 40 seconds. Click the Play button. Click Record to capture the part of the video you want as your ringtone, then click Stop. The Create button will turn red.

Click the Create button. You will then be asked to agree to the terms and conditions. Click I Agree.

You can now download, email or send your ringtone via SMS. There are a variety of formats supported, from iPhone to WAV, so these ring tones should work with almost any phone. Nearly every carrier in the United States is listed on the SMS option list, including Spring and Cricket.
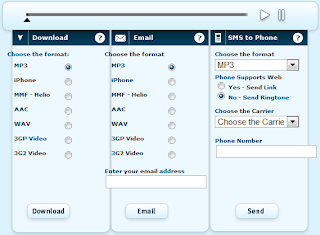
In our test the captured ringtone was crystal clear and worked instantly on both an iPhone and an older Samsung phone, both on the AT&T network. Tube2Tone is a fun way to find new and interesting ring tones.
Now when that familiar Nokia ring sounds in the supermarket, you can smile knowing it’s not your phone playing it as 20 people scramble to see if it’s their phone ringing. |
posted by Muhammad Tayyab @ 4:38 AM  |
|
|
|
| Increase Browsing Speed |
| Saturday, June 12, 2010 |
It's a very little known trick that you can increase your browsing speed under Windows XP Professional by 20% with a quick tweak to the Qos Packet Scheduler. By default, Windows keeps this 20% in reserve for Windows Updates, so if you're and XP Pro user and you want a little speed boost, then follow along!
Go Start>Run and type in gpedit.msc
From here, expand the Administrative Templates selection, then the Network tab.
Select Qos Packet Scheduler.
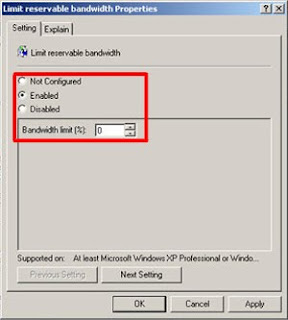
Now click on Limit Reservable Bandwidth and check the “Enabled” selection box.
Now change the Bandwidth limit to 0%, click Apply and restart your PC. You should then see an improvement in your browsing speed. If it didn't work, make sure you're running Windows XP Professional.
 |
posted by Muhammad Tayyab @ 4:00 AM  |
|
|
|
| HOW TO MERGE MP3 FILES |
| Friday, June 11, 2010 |
As an avid music listener, I too wished before to easily combine together an album’s songs into a single file. Merging several mp3 files into one has many benefits. It can continuously play my favorite songs with just a click of a button, save disk space, and manage my mp3 collections better.
The World Wide Web has many audio-merge plug-ins you can download and use. However, nothing comes close to Merge MP3. This program is very intuitive and easy to use. It does not need and follow complex installation processes.
After you’re done downloading the software, you’ll just have to unzip it and you can use the application immediately. At only 1.62mb, you can copy it to your flash drive and use it anywhere, anytime — without installing the program to other computers.
You can use Merge MP3 at no cost. Download it at
http://www.shchuka.com/software/mergemp3/#download
Save the zip file and click the OK button.
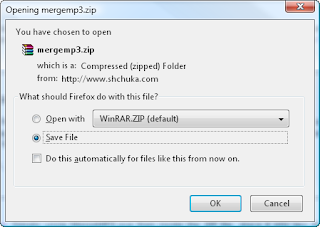
On the usual broadband internet speed, the download will last approximately 10 seconds. 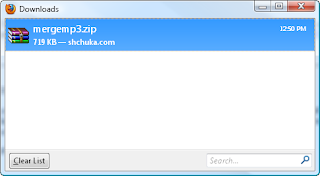 After the download is complete, extract or uncompress the zip file. The program does not need any installation. Click the following icon to run Merge MP3. 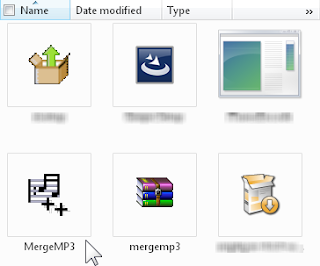 This is the application’s main interface. It’s very plain and simple. 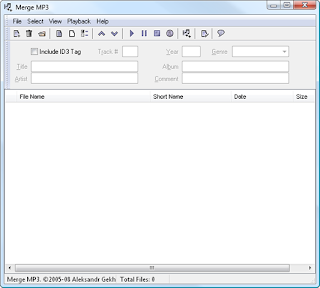 To start merging two or more mp3s, select which audio files you want merge and drag & drop them to the blank space (as shown below). If you have several folders to add to the merge list, just press the CTRL + D keys at the same time and select the folder. 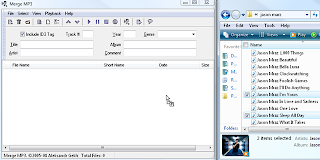 Select / highlight the files, right-click your mouse, press File, and click the Merge Selected… command. 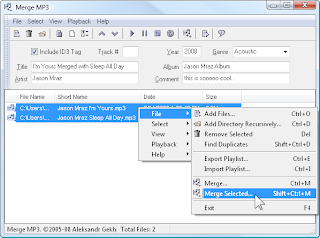 Choose a filename for the merged mp3s and click Save. You can also save the fused audio files aside from the default location.  For two mp3s, the merging process will take only around five seconds. Click the OK button to close the dialogue box.  To confirm the merging, you can check the output file at the destination folder. 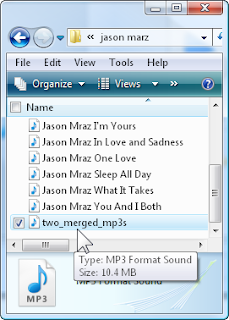 Play the merged file in your favorite audio media player. As you can see, the newly created mp3 file is a bit longer (both in file size and song duration). 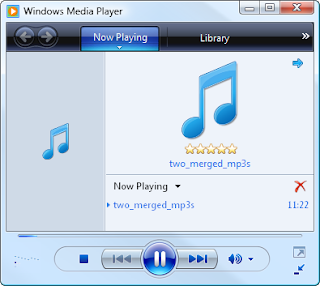 There are times when the merging will not work properly. This is due to a minor streaming mode problem. Don’t worry because this can be solved in just three clicks. You will get this message when you’ll encounter the said error.  To remedy this problem, click the View menu and Preferences….  Check Merge using raw stream mode and press OK.  After this, you can now merge several mp3 files the usual way. |
posted by Muhammad Tayyab @ 1:19 AM  |
|
|
|
| HOW TO MERGE MP3 FILES |
|
|
posted by Muhammad Tayyab @ 1:17 AM  |
|
|
|
| Pop-Up Blocks |
| Sunday, June 6, 2010 |
Q:
Internet Explorer's built in pop-up blocker works fine, but what do I do when it blocks pop-ups that I actually want? Is there a way to allow pop ups on some pages but not others?
A:
You can create a sort of "white list" for pop-ups with Firefox and Internet Explorer . This is nice for sites that have information boxes or screens that open as new windows that can get suppressed by the built in pop-up blocker.
With Internet Explorer (in XP with Service pack 2 installed) go to Tools/Pop-up Blocker then "Pop-up Blocker Settings". A box will come up where you can add domain names
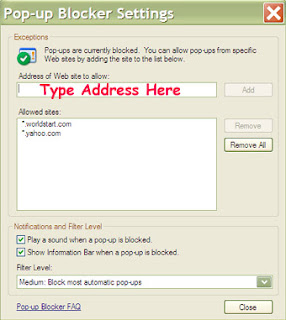
Just type in the domain under "Address of Web site to allow" then click the "Add" button. Now when you go to that domain you'll get to see any other windows that may come up.
Mozilla Firefox also has this feature. Go to Tools/Options and make sure the Content tab is selected. If you have "Block Popup Windows" checked, then select the "Exceptions..." button.
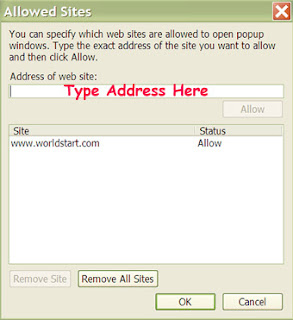
Type in the web site address then click the "Allow" button. This will bypass the pop-up blocker for pages on that domain. |
posted by Muhammad Tayyab @ 5:13 AM  |
|
|
|
|
|


